Showing posts with label Kid Stuff. Show all posts

Saturday, May 26, 2012

DIY Sun Catcher

This is an experiment and work in progress so please bear with me on this. Several people on Craftster have posted about making things out of melted plastic beads. I decided to make a sun catcher for my mom's new sun room.

What you need:
large bag of translucent plastic beads
oven safe pan, bowl, etc
oven

These are the beads I picked up at JoAnn's. They were $6.99, and I had a 50% off coupon I used on it.

I decided to make one large piece, and hang some smaller circles under it. So I used a pie pan, and cupcake pan. 
Preheat the oven to 400 degrees.
Put the beads in a single layer of the bottom of your pan. Make sure they go all the way to the sides and there are no gaps. This will give the most effective look. 
Place the pans in the oven. I did both at once to save time.
WARNING! This WILL smell bad. Be sure to turn on a fan and crack a window.
I let mine bake about 20 minutes. Times will vary depending on the oven and the beads. Just keep a close eye on them. Ideally you want to top to be very smooth and not bumpy, but if you have some bumps, it could look neat too.
When the beads have melted, removed the pans and let cool. About 10 minutes should be fine. Pieces should just pop or fall out. 

As you can see on the large one, the edges are a little bumpy. If you don't like this, add a little more beads around the edge from what I did. As you can see I did some small ones in single colors and rainbow.
I even melted a couple separately in a pan to see how far they'd go on their own. I don't know what I can can do with them, but they're cute.
Here is a closeup of one small piece. Please note the little bubbles. This will happen, and adds to the effect.

My next step will be to file off a few excess pointy parts and drill small holes in the pieces so I can tie them together so they hang. I will post photos when I'm all don't with my pieces.

Tuesday, September 13, 2011

7 Home Remedies for Kids

How Does She had a post about home remedies to help our kids when they're not at their best. Most of us have heard of the B.R.A.T. diet, but there's so much more to this. Head on over and read the full list. Maybe bookmark it for future reference.

Saturday, September 10, 2011

Make a Jellyfish

Bhoomplay's Blog has a pretty cool little tutorial on how to make a jellyfish in a bottle. Ok, it's a plastic bag, but it looks really cool.

Check out how to make this here. There's even a cute video showing kids playing with them. As soon as I can find someplace that has clear plastic bags, we're going to try this out. All my plastic bags are white or brown. I don't think it would have the same effect.

Friday, April 29, 2011

Kid Friendly Mother's Day Brooch

Simple, adorable, and not the typical gift. All the makings of a perfect mothers day gift.
See how to make these at LaughPaintCreate!

Tuesday, April 5, 2011

ABC/123 Printables

Sprik Space has made freaking adorable printable illustrated alphabet and numbers! I'm framing one of each for our playroom.
She made them in multiple colors to match any room! Go HERE to select your poster and color to download.

Friday, April 1, 2011

GummyLump Givaway!

GummyLump is giving away a fully stocked Melissa & Doug Lemonade Stand/Grocery Store! Enter before April 15th. There are lots of ways to get extra entries.

What kid wouldn't love to have that? Go HERE to enter today!

Tuesday, March 29, 2011

Dragon Slippers

 Cute, right? These are handmade by Made By Rae. Find out how to make them here.

Monday, March 28, 2011

Rainbows & Unicorns Party

There are so many cool birthday party ideas out there for kids. Hostess With The Mostess shows off a Rainbows and Unicorns party for little kids. 

Besides the rainbow layer cake and handmade unicorn horns, there are other great ideas. My favorite really has nothing to do with the theme. It's this:
It's a kid sized serving table that won't get dumped! She glued bowls to a sheet of poster board/foam core and the board was tied down to an ottoman. GENIUS! 

Thursday, March 24, 2011

Snack Time!

Easy. Delicious. Cute.
Random Thoughts of a SuperMom has the steps. They look so good and any kid would love it, right? My daughter won't go near them. She has an aversion to anything peanut. I've tried every trick and she still won't even take a bite. These, peanut butter sandwiches in dinosaur shapes, peanut butter cookies, peanut butter cups.  Nothing works. Hopefully she'll try it some day.

Toddler Wings

Get the tutorial on how to make these cute wings at llevoelinvierno.blogspot.com.

Tuesday, March 22, 2011

DIY Princess Tiara

Lu Bird Baby has a great little tutorial on how to make tiara's for the princess in your home. If you were having a princess themed party, you could make one for each girl.

Monday, March 21, 2011

Felt Cookies

I love these! My daughter will have a blast with them in her play kitchen. 

I just have to find the right colors of felt. So far I haven't found what I need in stores. You can find the tutorial for these here at Yarn Pirate. 

Candy Buttons

Remember those strips of candy buttons when you were a kid? Now we can make our own. fun!

  • 1 1/2 cups confectioners’ sugar
  • 1 egg white
  • 3 drops yellow food coloring
  • 3 drops blue food coloring


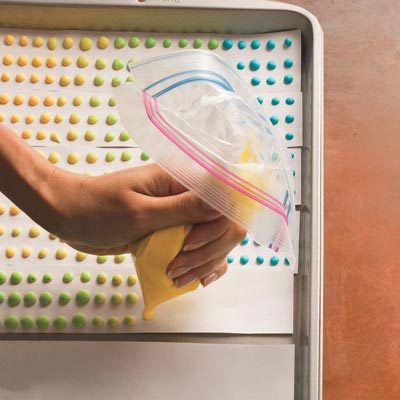
  1. Cut white paper into twelve 2-by-11-inch strips. Using an electric mixer, beat the confectioners’ sugar and egg white until thick and smooth, about 5 minutes. Divide the icing into 2 small bowls. Stir the yellow food coloring into one batch and the blue food coloring into the other. Cover the blue icing with plastic wrap.
  2. Arrange the paper strips side by side on a work surface. Scrape the yellow icing into a small, resealable plastic bag and snip off a tiny corner. Pipe out the icing onto the paper strips in dots, about 1/3 inch apart in even rows of 3. When about a quarter of the yellow icing remains, add approximately the same amount of blue icing to the bag, stirring with a toothpick. Continue to pipe green icing dots onto each paper strip. Transfer the blue icing to another small, resealable plastic bag and continue piping. Let the dots sit at room temperature until hardened, 12 hours or overnight.

Friday, March 18, 2011

Wednesday, March 16, 2011

Dragon Tails

I'm going to beg my sewing savvy mom to make one of these for my oldest daughter. She's obsessed with everything dinosaur related. This could be a T-Rex tail!
See the full tutorial at Tater Tots & Jello!

Monday, March 14, 2011

Tee Shirt Bibs

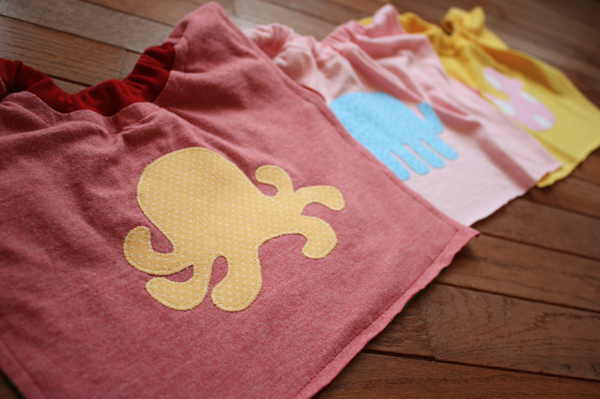
If I were even remotely good at sewing with a machine I'd be making a ton of these from thrift store finds. I love how cute they are. One can never have too many bibs.
See the complete tutorial on how to make this over at sewlikemymom.com.

Monday, March 7, 2011

Chalk Board Purse

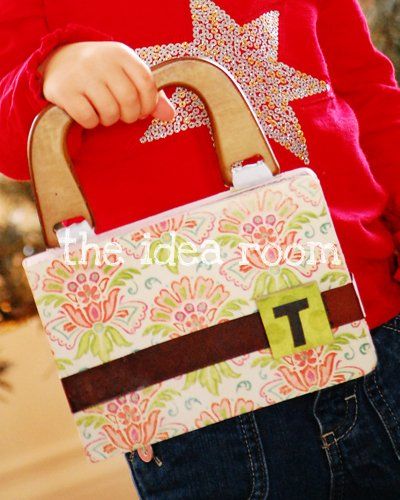
Convert an old kids board book into a chalk board purse! Makes a great quiet time activity when waiting at the doctor office or anyplace else boring for kids.
Check out the tutorial at The Idea Room for full photo filled instructions.

Friday, March 4, 2011

Robot Bean Bag Toss

Go to mykidsmake.com for a cute tutorial on how to make a robot for a bean bag toss!

Fun, right? It inspired me to make my own bean bag toss. My daughter would tear apart that robot in 5 minutes and it too young to make one. but a bean bag toss would still be great for a 2 year old!

First, I tasked myself with making bean bags. The problem? I'm really bad with a sewing machine. I couldn't get it to work. I had my mom come over to help me. She's a great quilter. Apparently I threaded the machine wrong. oops! I had the fabric squares to make 6 bean bags, and a big bag of dried pinto beans. Should be easy, right? Nope! I gave up after 3 because the thread kept getting caught or coming out of the needle. They don't look great, but they work.

Next what to do about the 'game' part of it all. I pulled out a big foam sheet. Yellow of course, as it's Phoebe's favorite color. I used markers and foam stickers to create a mat. Not my best work, and the stickers were already pulled off once by my lovely daughter. Promise not to laugh? Here it is.

I decided to work with her shapes and counting. The game is that she tosses the bean bag on what I tell her. Be it the heart shape, or the shape that  has 2 ladybugs. So far she just wants to pull the stickers off and try to make the mat fly...but she does like the bean bags! Oh well. At least I tried.

Thursday, March 3, 2011

Edible Teacups

For each teacup, you'll need:
  • Cup-style wafer ice cream cone
  • Round sugar or shortbread cookie
  • Decorator's icing
  • 2 gummy rings candies
  • Assorted candies, popcorn, or trail mix to fill the teacup
Instructions:
1. Use a serrated knife to carefully cut the cup portion of the ice cream cone from the handle (an adult's job). Discard the handle and set the cup aside for now.
2. Place a gummy ring candy on the center of the cookie, using decorator's icing to "glue" it in place.
3. Set the ice cream cone cup on top of the gummy ring. Again, use a thin line of decorator's icing to hold the cone in place, if needed.
4. For a teacup handle, slice the second gummy ring in half. Gently press the cut ends of one of the candy halves against the cone to stick the handle in place.
5. Fill the cup with a few candies or other snacks, and it's teatime!

From here. 

Wednesday, March 2, 2011

Polka Dot Shake


Serves 2

1 1/2 cups milk
2 large scoops vanilla ice cream
1 cup pitted strawberries
6 large marshmallows, cut in half

blend milk, ice cream, and strawberries in a blender until smooth. Press the cut marshmallows on to the inside of a clear glass. The marshmallows will stick. Pour and serve with a fun straw.

Random Recommendations